The hurricane hit us pretty hard over here. We're out of power, and with record breaking power outages it will probably be a while till it's back on. Posting on this iPhone app is frustrating, so I won't be posting until I have power again.
Prayers to those further east who got it worse<3
Tuesday, October 30, 2012
Wednesday, October 24, 2012
Basic and Advanced Shooting Modes Explained
If youre just getting started with your DSLR, all the new words and settings can be very confusing to you. So, today Im going to break down what the different settings mean, and what theyre used for.
 Heres what my dial looks like
(and pretty much what most other cameras dials look like as well)
First Ill explain the presets, which is the lower half. Basic Shooting Techniques.


(and pretty much what most other cameras dials look like as well)
First Ill explain the presets, which is the lower half. Basic Shooting Techniques.

With the "Basic Zone" modes, all you have to do is point and shoot, the camera sets everything automatically based on which mode youre in. Most point and shoot cameras also have these settings.
Starting with the green square in the center, working down the dial.
Full Auto - Pretty self explanatory, everything is automatic, everything will adjust itself for whatever you shoot, just shoot away.
Portrait - Portrait mode blurs the background to make the human subject stand out. It also makes flesh tones and the hair look softer than with the full auto mode.
Landscape - Us the landscape mode for wide scenery, night scenes, or to have everything in focus from near to far. The greens and blues also become more vivid and sharper than with full auto.
Close up - When you want to photograph flowers or small things close up, use the close up more. To make small things appear much larger, use a macro lens.
Sports - To photograph a moving subject use the sports mode. You can use this to shoot a child running, playing sports (as the name suggests) or even a moving vehicle.
Night Portrait - To shoot someone at night and obtain a natural looking exposure in the background, use this mode. Using a tripod will help prevent camera shake in the low light.
Flash off - In places where flash photography is prohibited, use the flash off mode. This mode is also effective for candlelight scenes when you want to capture the ambient light. This is another one where you might need a tripod if the light is somewhat dim.
*Movie Shooting - (Live View) Not all cameras have this, my Canon T1i does, so Im explaining it. Using this mode will close the view finder, and the screen will now work like a point and shoot. To focus you now press the little * button, half pressing the shutter button doesnt work in this mode. When focused press the shutter button to take a photo, or the button with the little red camera above it to take video. Note: this camera will not keep autofocusing while youre shooting, when your subject moves out of focus you have to refocus yourself, the camera wont do it for you. Also, focusing can be pretty noisy, and you can hear it in the video. If you want to take good videos get yourself an actual video camera.
Now for the upper half, Advanced Shooting Techniques.

In the basic zone modes (explained above) to prevent spoiled shots, most functions are set automatically and cannot be changed. In theses modes you can change your settings to achieve the image you want.
Going up from the green square..
Creative Auto Shooting - Some people might put this under the basic modes, but Im explaining it under more advanced. Basic modes except creative auto take care of everything, whereas the creative auto mode enables you to easily change the pictures brightness, depth of field, color tone, etc. The default settings are the same as the full auto mode.
Program AE - In the program ae mode, you can set various functions and be more creative. The camera sets the shutter speed and aperture automatically to obtain the standard exposure. P stands for program; AE stands for auto exposure.
Action Shots - You can either freeze the action or create motion blur with the Tv (shutter priority AE) mode. Tv stands for Time Value. In this mode you can change the shutter speed, ISO, exposure comp, flash exposure comp, picture style, white balance and metering mode, aperture is automatically set.
Aperture Priority - To obtain a blurry background or to make everything near or far look sharp, set the mode dial to Av, aperture priority AE) to adjust the depth of field. Av stands for aperture value, which is the size of the diaphragm home inside the lens. In this mode you can change aperture, ISO, exposure comp, flash exposure comp, picture style, white balance and metering mode. Shutter speed is automatically set.
Manual - Pretty self explanatory, in manual mode, you manually set everything, nothing is automatic unless you set it to auto. In this mode you can change the shutter speed, aperture, ISO, exposure comp, flash exposure comp, picture style, white balance, and metering mode. Nothing is automatically set.
Auto Depth of Field - Objects in the foreground and background will be in focus automatically. All the AF (autofocus) points will function to detect the subject, and the aperture required to attain the necessary depth of field will be set automatically. In this mode you can change the ISO, exposure comp, flash exposure comp, picture style, white balance, and metering mode. The shutter speed and aperture are automatically set.
I hope this helps you understand you shooting modes a little better. If anything is unclear or you have any suggestions please feel free to leave a comment below.
For a break down on shutter speed and aperture click ->HERE<-
For a break down on some photography terminology click ->HERE<-
Disclaimer: All photos are mine, unless otherwise stated. All opinions are my own. No monetary exchange occurred in exchange for this post.
Thursday, October 18, 2012
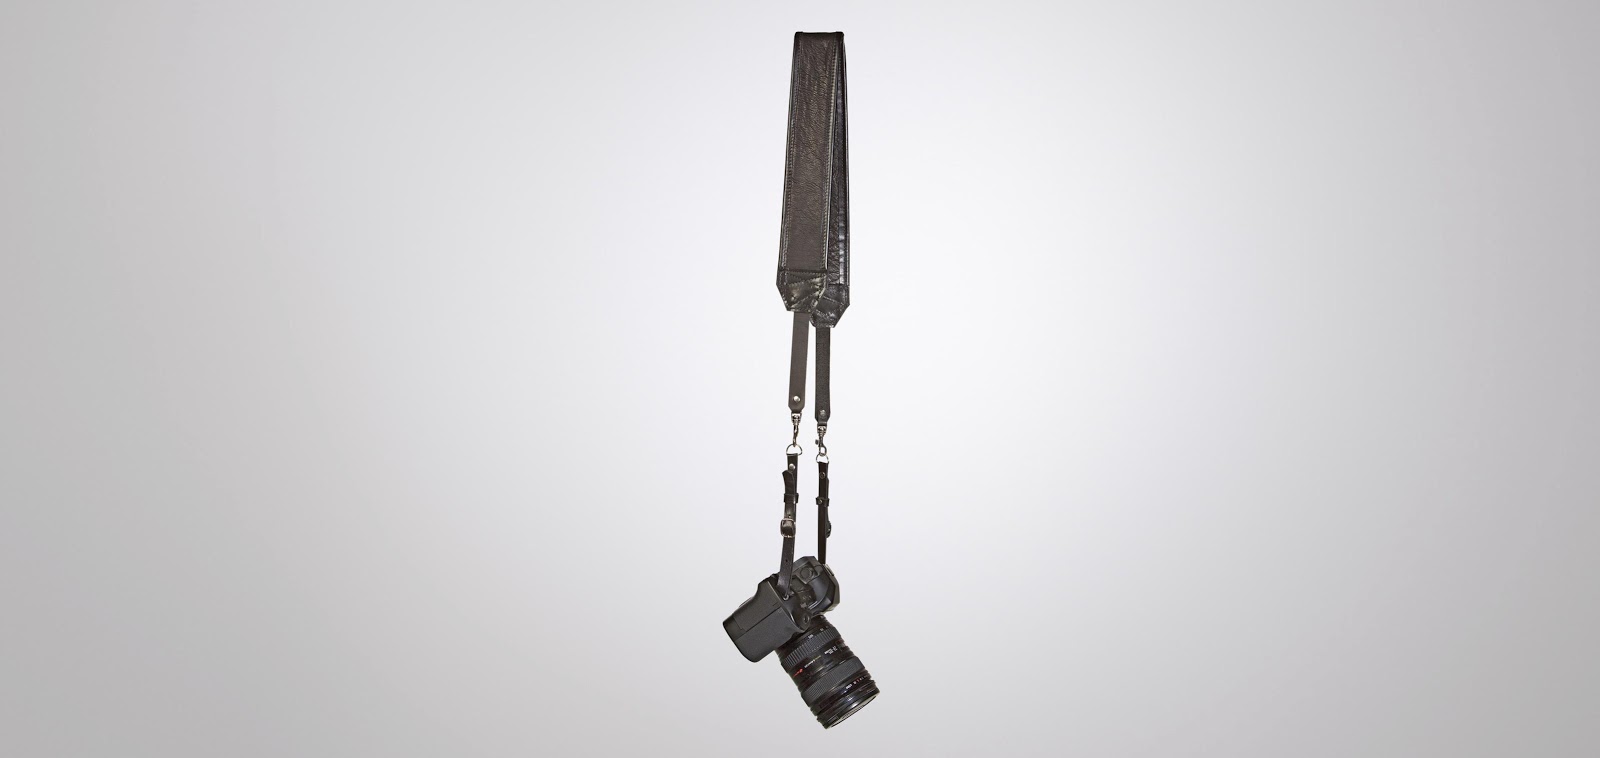
Heavy Leather Review
I was SO excited when I got these in the mail!
By far the coolest camera straps Ive ever seen!
Heavy Leather NYC was founded by Rachael Becker in the spring of 2008. Combining her love of leather and heavy metal, she began accessorizing bands across the world with her 'guitar armor'. They make some badass guitar straps, but they also make a few (really cool) camera straps. (as well as belts and wallets) Handmade from the best USA brand leather, theyre unmatched in quality and craftsmanship.
HEAVY LEATHER NYC has rocked the shoulders of Lemmy Kilmister/Motorhead, Slash, Judas Priest, Jesse/Eagles of Death Metal, Uli Jon Roth, Testament members Eric Peterson and Greg Christian, Kim Mcauliffe of Girlschool to name a few. The guitar straps have been featured in publications such as Cosmopolitan Magazine, Hails and Horns Magazine and Mass Appeal Magazine.
Rachael sent me some sample camera straps, and I was amazed at how awesome they are. I mean on HeavyLeatherNYC.com they look super cool, but in person, theyre 100 times cooler.
About the Straps:
Classic Camera Strap in Pebble White - $95
 Classic Camera Strap in Black - $95

 The base leather is a soft 3/4 oz cowhide. The shoulder piece is 2 3/4" wide x 15" long and padded with a business card holder towards the back. The buckle sits flat, centered on the shoulder pad. The strap is 1" wide, length is 45-51". There is a snap in the back of the strap to lock your camera in place when not in use. The strap attaches to the camera with a quick release swivel snap. This strap is for the pros- built to last!
My thoughts:
Since these straps are leather, theyre about a thousand times more comfortable than the strap that comes with your camera. Not to mention a thousand times better looking. And since theyre leather, theyll of course break in and become even more comfortable.
I put the black one on my camera to feel it out. I LOVED how it felt. It was the perfect length (its also adjustable, so if you want it a little longer or shorter, you can do adjust it accordingly; or if you need to you could always add more holes to fit your needs)
They attach to your camera like your original strap attaches, but they also have little clips, for quick release, or if you own more than one you can switch them out really easily.
The sling strap attaches a little differently, and has key rings you put on that the clips attach to. I tried on the sling for a minute, and it seemed really comfortable. It was padded a little, which is really nice. The snap is pretty cool for when your cameras not in use, it kind of keeps it out of the way.
All in all, I love these straps; and although theyre a bit pricy, I can definitely see myself buying them in the future.
Go here to find out more about Heavy Leather NYC.
You can also find Heavy Leather straps at B&H Photo, Adorama, Amazon, or go here to find more stores.
I wanna send huge thanks to Rachael! And everybody over at Heavy Leather NYC, keep rockin!
Disclaimer: Photos are from HeavyLeatherNYC.com. The product in this review was provided to me for the purpose of writing a review. This in no way effects the quality of the review provided. All opinions are my own. No monetary exchange occurred in exchange for this post or review. The views expressed in this review are strictly my own opinions. All reviews provided here are the work of myself and remain completely unbiased.
By far the coolest camera straps Ive ever seen!
Heavy Leather NYC was founded by Rachael Becker in the spring of 2008. Combining her love of leather and heavy metal, she began accessorizing bands across the world with her 'guitar armor'. They make some badass guitar straps, but they also make a few (really cool) camera straps. (as well as belts and wallets) Handmade from the best USA brand leather, theyre unmatched in quality and craftsmanship.
HEAVY LEATHER NYC has rocked the shoulders of Lemmy Kilmister/Motorhead, Slash, Judas Priest, Jesse/Eagles of Death Metal, Uli Jon Roth, Testament members Eric Peterson and Greg Christian, Kim Mcauliffe of Girlschool to name a few. The guitar straps have been featured in publications such as Cosmopolitan Magazine, Hails and Horns Magazine and Mass Appeal Magazine.
Rachael sent me some sample camera straps, and I was amazed at how awesome they are. I mean on HeavyLeatherNYC.com they look super cool, but in person, theyre 100 times cooler.
About the Straps:
Classic Camera Strap in Pebble White - $95

The Classic strap length is 46-49" adjustable by leather pieces in the front, made to fit both men and women. The base leather is a 2" double sided soft 3/4 oz buttery cowhide. The sides are bound in leather for smooth comfort around your neck. This style can also be worn on one shoulder slingshot style.
Slingshot Strap in Vintage Brown - $145
My thoughts:
Since these straps are leather, theyre about a thousand times more comfortable than the strap that comes with your camera. Not to mention a thousand times better looking. And since theyre leather, theyll of course break in and become even more comfortable.
I put the black one on my camera to feel it out. I LOVED how it felt. It was the perfect length (its also adjustable, so if you want it a little longer or shorter, you can do adjust it accordingly; or if you need to you could always add more holes to fit your needs)
They attach to your camera like your original strap attaches, but they also have little clips, for quick release, or if you own more than one you can switch them out really easily.
The sling strap attaches a little differently, and has key rings you put on that the clips attach to. I tried on the sling for a minute, and it seemed really comfortable. It was padded a little, which is really nice. The snap is pretty cool for when your cameras not in use, it kind of keeps it out of the way.
All in all, I love these straps; and although theyre a bit pricy, I can definitely see myself buying them in the future.
Go here to find out more about Heavy Leather NYC.
You can also find Heavy Leather straps at B&H Photo, Adorama, Amazon, or go here to find more stores.
I wanna send huge thanks to Rachael! And everybody over at Heavy Leather NYC, keep rockin!
Disclaimer: Photos are from HeavyLeatherNYC.com. The product in this review was provided to me for the purpose of writing a review. This in no way effects the quality of the review provided. All opinions are my own. No monetary exchange occurred in exchange for this post or review. The views expressed in this review are strictly my own opinions. All reviews provided here are the work of myself and remain completely unbiased.
Friday, October 12, 2012
How-To: Light Art
.jpg)
Light art, or light photography, is one of my favorite. I love the abstract aspect of it. I love how easy it is. I love that you can do it in your own home.
What light art is: a form of visual art where main media of expression is light.
What that means: in a dark environment, you take your camera, and some light. The light can be just a flashlight, a glowstick, any shape, and color, any size. You take a photo at a very slow shutter speed, move the light in your desired shape or design, and viola, youve got light art.
Light art has become very popular recently, and people are getting really creative with it. A Google image search brings up tons of amazing pictures.
Here are some of my favorites:

Image by: Gizmodo

Image by: LAPP

Image by: Signes de Luimiere
Light art doesnt always have to have people in it, a lot of it is just shapes and designs.
You can really go anywhere you want to take these kind of photos, as you can see some of these photos are outside. You just want to make sure youre in a dark enough environment that your image wont be over exposed. Since youre working with a slow shutter speed, if its too light outside, your image is also going to be too light.
For these example photos Im shooting in my bathroom, since its the only room in the house that doesnt have windows, and its about 11 am. I also tried covering the window in the computer/art room, some photos still turned out a little bright from the small amount of window not covered though. Heres some examples of photos I took:


(for these photos I shot on: bulb - F29 - ISO 3200)
[I used a timer remote and held it in only as long as I moved the light]
As you can see some pictures came out better than others. Some I had to edit to darken the background. But really, light art isnt about trying to get everything exactly perfect, for me anyway, its about having fun and creating cool images.
Remember: dont be afraid to experiment, think outside of the box, and most of all have fun!
Keep on shooting :)
Disclaimer: All photos are mine, unless otherwise stated. All opinions are my own. No monetary exchange occurred in exchange for this post.
Thursday, October 11, 2012
Keep It Clean: LensPen Review.
Keeping your lens clean is verrrrryyy important. Dust dirt and fingerprints or smudges can degrade your image quality, and even obscure your image. So what I use to keep my lens clean is the LensPen.
"A superb new tool in optical lens cleaning technology.
Perfect for cleaning camera lenses, binocular lenses, small aperture spotting scopes and telescopes, eyepieces, and other optical items. Comes with a handy retractable dust removal brush and a special non-liquid cleaning element, designed to never dry out. Safe and very easy to use."
(text from LensPen.com)


 LensPen is on the left in all images, knockoff is on the right. You can see its shorter. The brush is not as full, and not as soft. The brush actually doesnt lock in place and stay up, you have to hold it up to keep it from going back in when brushing off the lens. The cleaning tip (Im not sure if its made out of the same stuff as LensPen) you can see that its not curves like the LensPen, its slightly smaller, but seems to work basically the same. As with everything, if you buy a knockoff its not going to be as good as the origonal, so buy from a reputable store that sells authentic merchandise.
No matter how many new microfiber cloths come out, no matter how fancy and expensive they are, I will always buy LensPen. (or at least until something truely better comes out) LensPen is extremely affordable and works better than any expensive cleaning cloth or spray Ive ever used.
Hope this review helps. Feel free to leave requests of anything youd like me to review. Thanks for reading. And remember:
"A superb new tool in optical lens cleaning technology.
Perfect for cleaning camera lenses, binocular lenses, small aperture spotting scopes and telescopes, eyepieces, and other optical items. Comes with a handy retractable dust removal brush and a special non-liquid cleaning element, designed to never dry out. Safe and very easy to use."
(text from LensPen.com)

Ive been using the LensPen for a few years now, and in my opinion, it beats all the competition. Everything from microfiber cloths to cleansing sprays.
The LensPen has a brush at one end, to remove dust and debris. The brush slides out and locks into place. The bristles are very soft, and will not scratch or damage the lens at all. I havent experienced any shedding. At The other end of the pen is a unique non-liquid carbon compound cleaning element. Carbon absorbs oil, so this tip removes fingerprints like nothing else Ive ever used. Inside the cap is a little sponge, which cleans the tip of the pen with just a slight turn of the cap. Since this doesnt use liquid it will never dry out, and will last much longer, since it wont run out of liquid.

You clearly see a fingerprint on the lens, before using LensPen.

No fingerprint or residue, after using LensPen.
You can find LensPen at most camera supply stores. I got mine at Allens Camera, which is right down the street from my house. I got it for $9.99. You might be able to find it as cheap as $6-$7 online. (just be careful of fakes)
I bought a few things off Amazon.com a while back, and it came with a LensPen knockoff, here you can see the differences.


No matter how many new microfiber cloths come out, no matter how fancy and expensive they are, I will always buy LensPen. (or at least until something truely better comes out) LensPen is extremely affordable and works better than any expensive cleaning cloth or spray Ive ever used.
Hope this review helps. Feel free to leave requests of anything youd like me to review. Thanks for reading. And remember:
Keep on shooting. :)
Disclaimer: All photos are mine, unless otherwise stated. All opinions are my own. No monetary exchange occurred in exchange for this post or review. All items mentioned in this review were purchased by me, for my own personal use, and not for review purposes. I am simply sharing my opinions.
Lesson: Photo Lingo
I know photography "slang" can be very confusing..and honestly, a lot of the time the words are just redundant, and mean nothing more than changing the shutter speed or exposure.
Working in your presets help you avoid running into these words, but lets face it..you will never be able to take full advantage of your cameras (and your own) abilities until you figure this stuff out. So Im going to try to make it a little easier on you.
Here is a quick explanation of some confusing terms you might run into:
ISO speed - This one might not be as confusing, I did touch on this a little here, but basically, what that does, it controls how sensitive your cameras sensor is to the light that reaches it. If your ISO is too high your image will be too light, too low and your image will be too dark. Adjusting this is one of the main things that will affect the exposure of your image.

 Auto Exposure Bracketing - (AEB) This is something that can be very useful in certain situations. When you dont have time to be messing with your settings in between every shot and want to take an image at different exposures. How this works..you will see your exposure compensation meter again, but this time when you change it you will see two lines which move opposite of each other, so when you turn it once, they will be at the same spots, one on the left side of 0, one on the right. You will then take three shots of the same image, and your camera will adjust the exposure for you. Taking one at 0, then one darkening and one lightening to where you have it set. (having it on continuous shooting makes this easier) Every camera is different for setting this, so check your manuel if you arent sure how.

TTL metering - This stands for "Through The Lens" Metering. And all that does is measures the light reflected back through the camera lens from the scene in front of it.
Center Weighted Metering - Using the cameras exposure meter to concentrate on the central 60-80% of the image.
Flash Ratio - The balance of natural and artificial light when using more than one light source.
Hyperfocal Distance - The distance into your picture at where the selected aperture will be most effective.
Depth of Field - the distance between the nearest and farthest objects in a scene that appear acceptably sharp in an image.
Hopefully that helps clear up some confusion. As you can see most of these terms have to do with shutter speed and aperture, or exposure of your image.
Working in your presets help you avoid running into these words, but lets face it..you will never be able to take full advantage of your cameras (and your own) abilities until you figure this stuff out. So Im going to try to make it a little easier on you.
Here is a quick explanation of some confusing terms you might run into:
ISO speed - This one might not be as confusing, I did touch on this a little here, but basically, what that does, it controls how sensitive your cameras sensor is to the light that reaches it. If your ISO is too high your image will be too light, too low and your image will be too dark. Adjusting this is one of the main things that will affect the exposure of your image.
ex. here is the same image, at the same settings, just changing the ISO speed.
click to enlarge image
from left to right: iso 100, iso 200, iso 400, iso 800, iso 1600, iso 3200
Exposure Compensation - This goes hand in hand with what I talked about here, when you adjust your aperture/shutter speed, sometimes its still to dark or bright, so you can adjust this to compensate for that. On your camera it will look like the image below (the highlighted area) It will show -2..1..0..1..+2 (or something similar) Adjusting to the + side will brighten your image, adjusting to the - side, will darken your image.
ex. heres some shots I took using AEB.

click to enlarge image
from left to right: exposure -2, exposure 0, exposure +2
Bulb Exposure - This is a shutter speed setting. When set at bulb, or just b on some cameras, you basically hold in the shutter release button as long as you want the shutter to be open. This is good for when you want to test different shutter speeds without having to manually change it every time. Using a timer remote is helpful when shooting in bulb, because it reduces possible shake from your hand on the camera.TTL metering - This stands for "Through The Lens" Metering. And all that does is measures the light reflected back through the camera lens from the scene in front of it.
Center Weighted Metering - Using the cameras exposure meter to concentrate on the central 60-80% of the image.
Flash Ratio - The balance of natural and artificial light when using more than one light source.
Hyperfocal Distance - The distance into your picture at where the selected aperture will be most effective.
Depth of Field - the distance between the nearest and farthest objects in a scene that appear acceptably sharp in an image.
Hopefully that helps clear up some confusion. As you can see most of these terms have to do with shutter speed and aperture, or exposure of your image.
Remember: Don't be afraid to play with your settings, sometimes just reading about it isn't enough. Get hands on..practice different set ups until you figure it out. This can be a very confusing topic that can take some time to understand. Don't let the technical words scare you away, once you get the hang of it you'll completely impress yourself.
Keep on shooting. :)
Disclaimer: All photos are mine, unless otherwise stated. All opinions are my own. No monetary exchange occurred in exchange for this post.
Thursday, October 4, 2012
How-To: Water Drops
Photography is basically my biggest passion in life. For days now I've just been aching to shoot. But being sick and couch ridden for a week or so I haven't really been up for much more than movies and soup. Thankfully today I feel better and was able to actually get off the couch. So today I finally busted out my camera and set up some of my favorite in home shots.
Water is such an amazing thing to shoot.. You can do slow shutter speeds on flowing water to create a smooth silky effect. And you can do fast shutter speeds to freeze the image and capture splash.
(find out more about shutter speed here)
Today, being inside, I went with a fast shutter speed and photographed some water dripping into water.
Here is my easy in home set up for photographing water drops:
(This is an amazingly easy set up. Everything I used I found around the house. And I actually set it up in my bedroom.)
Things you'll need:
Shallow dish (I used a 9x9 glass baking dish lined with tin foil)
Small ziplock bag (with a pin size hole in the middle on the bottom to allow water to drop out one drop at a time)
4-6 lights
Tripod (I used two, one for my camera, and the other to hold up my bag of water)
I put my tripod on the table. Placed my dish of water below it. Clamped my bag of water to the tripod above my dish of water. And set up about five lights behind my set up.
I attached my 18-55mm lens to my camera, put it on the tripod, attached my timer remote, and turned my dial to M.
I used the following settings:
Shutter speed - 1/1600
Aperture - 7.1
ISO - 400
Flash on
Autofocus OFF
It can be very hard to focus on the water as its dripping past the lens. So to help focus I use a pen and put the tip in the water exactly where the water is dripping.
Now that you're all set up its time to snap some shots. Timing can be tricky. Too early and you catch the drop before it hits the water. Too late and you only get the ripple after. So just play with your timing until you get the shot just right. (I used my time remote to prevent any slight shake)
Here are a few shots I took today:
(I adjusted brightness/contrast and hue/saturation to bring out some detail and enhance the drops more)


Reviews
I've been blogging for a while now (check out my beauty blog here) and some of my most popular posts are review posts. I love doing reviews on products I've tried, I always give my 100% honest opinion and let you know exactly how I feel about a product. I never accept money for my reviews. (yes sometimes products are given to me in exchange for a review on them, but as I said my reviews are always honest) I was going to post a review on a few things I have in my camera bag today, but I wanted to check with my readers first. Do you want me to keep this blog informational (no reviews) or would you like to see some reviews?
I would love for you guys to throw me some suggestions and requests for posts! So don't be afraid to comment and let me know what you think! :)
I would love for you guys to throw me some suggestions and requests for posts! So don't be afraid to comment and let me know what you think! :)
Subscribe to:
Posts (Atom)